The following post is a quick update on what I have been making for my Venetian doll's house -
VILLA LEONE
PLANTS:
I underplanted the orange geraniums with ivy leaves from
I also made some additional plants for the patio. The herb plant
(basil?)below started life as a micro hosta plant kit intended for model railroad landscaping.

LAMPS:


 Christine uses this method to "solder" her plastic horse models together when changing their poses. It can be sanded and stained and is as hard as rock! LOVE IT!!!

IRON:

STONE:
elizabeth
VILLA LEONE
 |
It's July already and I have hardly spent any time in my Real Life garden. I have a BIG garden which regularly requires LOTS of my time and attention, however during the last 3 weeks of June, instead of being outside grooming it and pulling weeds, I was happily indoors making paper plants for Villa Leone.
Most of the plants were made with kits which I already had on hand.
In the photo above I made the orange geraniums for the wall planters, using the Fabulous kits from
TEMPLEWOOD MINIATURES
Most of the plants were made with kits which I already had on hand.
In the photo above I made the orange geraniums for the wall planters, using the Fabulous kits from
TEMPLEWOOD MINIATURES
http://fineflowersinminiature.com/epages/1f2f454e-ce84-48cc-9680-531b5aea95ac.sf/en_GB/?ObjectPath=/Shops/1f2f454e-ce84-48cc-9680-531b5aea95ac/Categories/1d0d2cade49078f9d43bbdfab67abbc0/11
I underplanted the orange geraniums with ivy leaves from
A LITTLE MORE IN MINIATURE
http://www.alittlemoreinminis.com/lastCutSheets.asp
The flower kits I bought were white but I painted them in different shades and tints of orange,( after they'd been assembled), using watercolors, inks and felt- tipped pens. The printed leaves are already beautifully shaped and authentically colored, with a good supply of materials in each kit.
 |
 |
 |
| A closer look at the plants. I included 3 of my own fading blooms into the mix using the Marigold Flower Soft material. I LOVED assembling these flower kits and I especially like the look of the leaves, as well as the ease of removing both blossoms and foliage from the laser cut master sheet. |
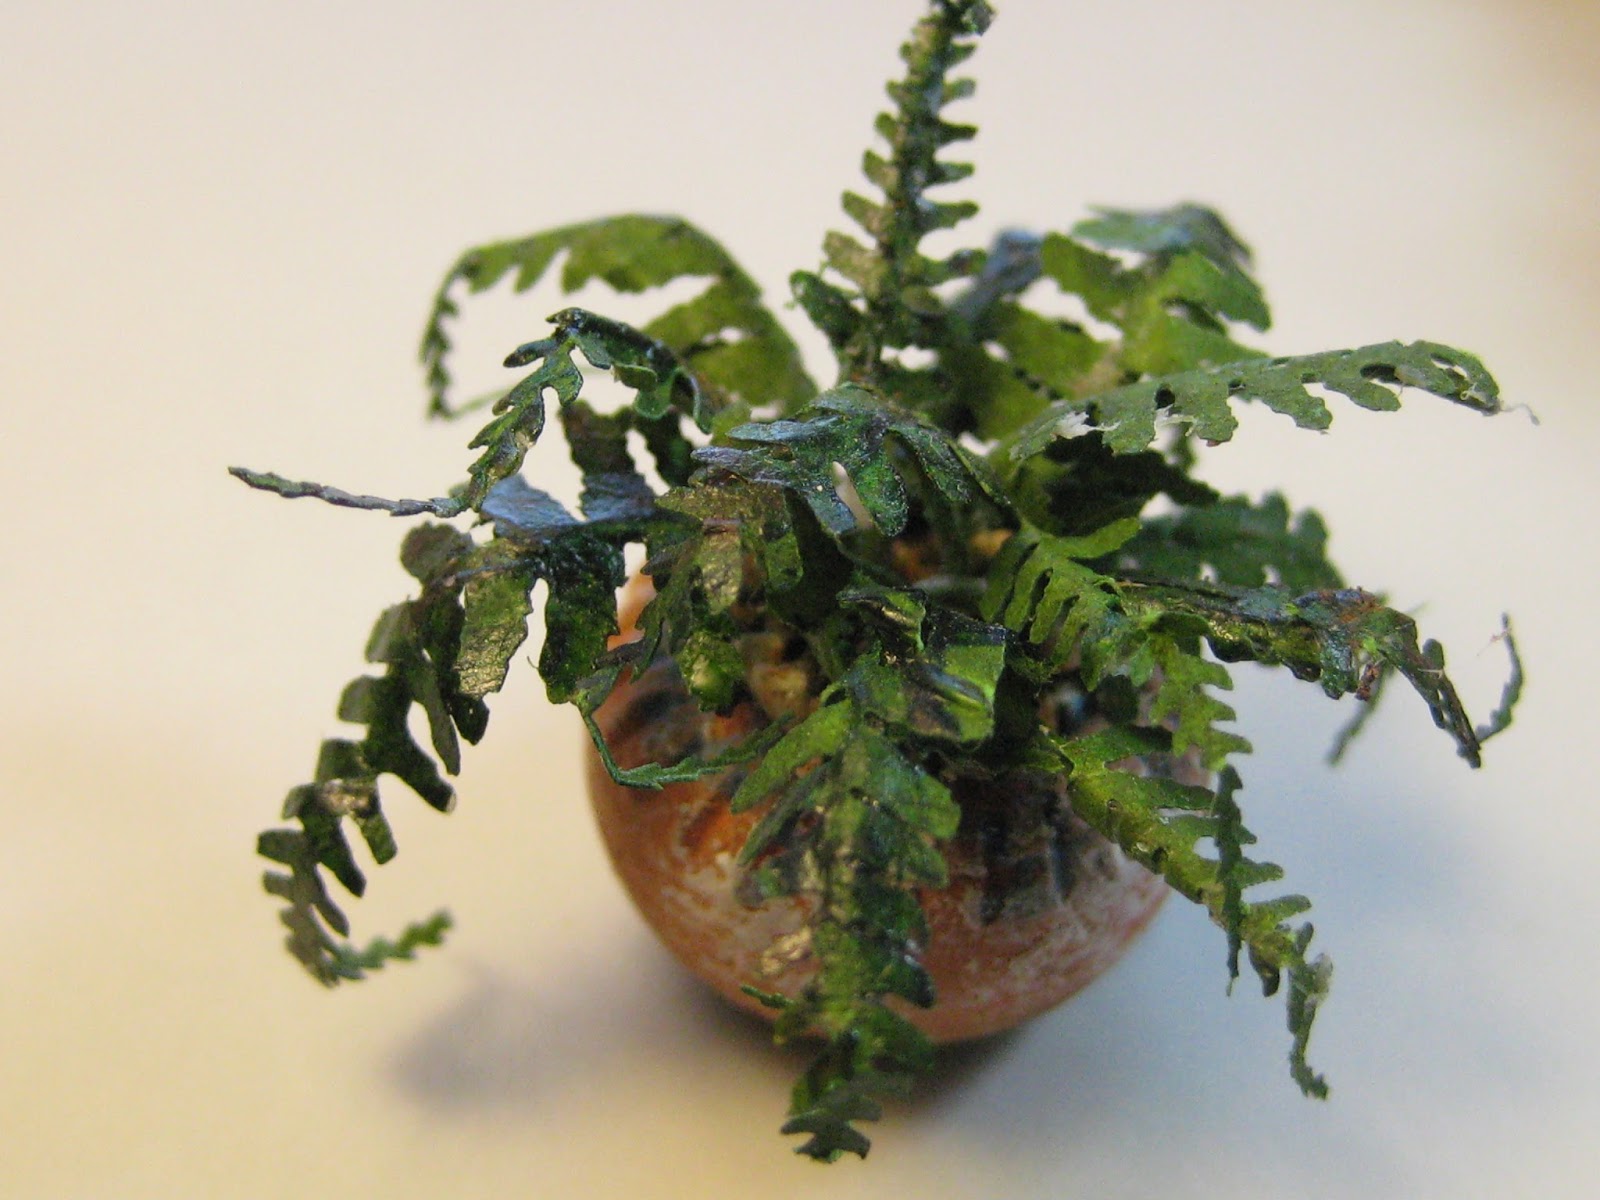 |
| The fern kit came from MELISSA'S MINIWERELD http://www.melissasminiwereld.nl/bloemen-en-planten-1-12.html I enjoyed constructing this delicate fern even though I mangled it somewhat through constantly changing my mind about which container it would finally occupy. |
 |
| In memory of my mother, I decided to try to make a nasturtium plant using circle paper punches for the leaves and crepe paper for the blossoms. Although I think that it looks close enough to a nasturtium, I am going to give it second try in an attempt to get a a more detailed blossom, and hopefully the next one will look better. The blue trailing plant was originally supposed to be a lobelia but the blossoms are too big. So now I'm calling it "a mystery plant" |
 |
| For the "mother-in-law's tongue/snake plant", I followed the video tutorial on JOANNE'S MINIS https://www.youtube.com/watch?v=ePzgTMgpes4 I used the twist ties just as Joanne instructed, but rather than cut out each leaf before painting, I found it easier to base paint the entire block of plastic ties first and then separate them, shape them and detail them. I'm quite pleased with the results! |
 |
| Having already made a whole bunch of roses last January, (none of which were the right color), I decided to make even MORE this time using orange oragami paper. My idea was to try my hand at making a rose tree to sit on the front balcony. I was able to use up all of the "homeless" rose leaf stems I had stockpiled, and managed to fill up the top of the tree in a believable way. If only the foliage on my Real Life roses looked this healthy! |
 |
| After I made the orange rose tree, I decided to make another shorter one and try and use up as many of the pink roses I'd made earlier this year. The photo below shows the base beginnings of the shorter rose tree. |
 |
The base is formed from dried lichen from railroad landscaping material hot glued onto a stem. For the support above I used a dried stick, but I used a paper covered wire for the orange topiary pictured below. |
 |
| A Group Shot. |
 |
| The wall planter and the tall rose tree positioned on the front balcony. |
(basil?)below started life as a micro hosta plant kit intended for model railroad landscaping.

 |
| The bottle of Chianti is a necklace bead, which was already covered with twine. I inserted a clear push-pin into the top, and painted it with green glass paint. I glued another bead to the top of the push-pin and painted it with brick red acrylic paint and sealed it with Revlon Matte nail varnish which dulled it down enough to look waxy. I glued on a flat spacer to the bottom of the bottle so that it would stand upright, then painted it to tie into the "straw". Now all that's missing is my glass Salute! :D |
LAMPS:
 |
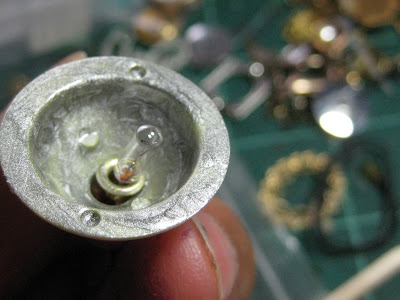
| I needed at least 3 matching exterior lamps for the outside of VILLA LEONE 2 for the front and 1 for the side, and as usual, everything that I LIKED on line, was way out of my budget. I had tried earlier in June to make some lamps but I didn't like the results and so I brooded and continued to scour the internet hoping to find something suitable which I could afford: I didn't- so I had to come up with a solution of how to make the 3 exterior lights myself. I started with the necklace bead that you see in the photo above. The necklace was purchased at the thrift store several years ago and I remember how excited I was because not only were the beads of various sizes but they also easily separated into 2 halves! |
 |
| I began searching through my bead boxes for additional materials to build up the shade to form the light fixture. Below are some of the components I used for it. |
 |
 |
| I glued the shade to a plastic bit from the hardware store, and then to a 3rd bead at the top of the shade. I used Quick Grip glue to attach each bead to the next. The toothpick was placed through the holes to keep them aligned and to keep the glue from clogging up the opening. |
 |
| I glued in a brass eyelet into the center of the shade. |

 |
| When the glue had set, I threaded a light bulb through the shade. In the photo below, later, I decided to paint the interior of the shade with silver nail polish and then I reinserted the light bulb. |

 |
| To make the frame I used a heavy gauge wire which I shaped over a dowel. Once that was done I inserted one end into the hole at the top of the shade and secured with a drop of Super Glue. |
 |
 |
| I wrapped the wires around the metal frame and squished a crimp bead under the wires and secured it with liquid Super Glue. |
 |
| To increase the size of the light bulb, I used the smaller portion of a gel capsule and after cutting a couple of half circles out of the top edge so that the heat could escape, I adhered it to the shade right over the light bulb. |

 |
| The base of the light fixture is composed of 2 bead caps glued together. Because of the imbalance of the light I needed to make sure that the wire frame would remain secure. I saw this GREAT TECHNIQUE on Christine Sutcliffe's blog: LAST ALLIANCE STUDIOS http://lastalliancestudios.blogspot.ca/2016/06/yet-more-mini-customs.html Christine makes custom model horses and their tack and she passed along her method of using liquid SUPER GLUE combined with BAKING SODA as a SUPER STRONG BONDING METHOD. I decided to give it a try. |

 |
| I insetted the wire frame into the base of the light fixture. I added a drop liquid( not gel) Super Glue and then while it was still wet, I sprinkled on some Baking Soda and then added one more drop of the liquid super glue and blew off the excess power. IT WORKED A TREAT! A solid bond that would take the weight without sagging. |

 |
| I painted over the entire unit with a bronze nail polish and left it to dry overnight. Later, I overpainted the lights with a variety of acrylic paints, and when they were dry, I tested them out to make sure that they still worked. |

 |
| I positioned them on the wall of the upper balcony and drilled a hole for the wires to pass through. I added another eyelet into the feed hole in the wall. The bases are currently held to the wall with blue tack. I needed to establish their location so that I can plan for the wiring once I start working on the inside of the house. As I was telling Janine on the phone today, I don't think that these fixtures are finished yet since they look to me to be a bit raw. Perhaps, if I leave them alone and focus on something else, the solution as how to finish them will eventually present itself. Meanwhile, I was able to construct the 3 exterior lamps that I needed for a fraction of the cost, by using up the materials I already had on hand! and I'm quite HAPPY ABOUT THAT! :D |
IRON:
 |
| I ordered these chipboard gates from ALPHA STAMPS http://www.alphastamps.com/Collage_Supplies-Die-Cut_Chipboard/c4_131/index.html?page=1 the kit contained 2 sets of gates both large and small. Eventually the large ones will be the gates for the garden entrance but the smaller pair were for the security bars on the main floor windows. |
 |
| I began by painting them black and then overpainted them with a textured acrylic paint. The gate on the left has the textured paint. When they were both done, I gave them a sealer coat of matte MOD PODGE and then a thin wash of a brown. They are the perfect width for the windows, however I eventually intend to have them attached to stand out from the frame. So these too, are still unfinished. |

 |
| This gives you an idea of the effect. I also added a carved motif to this section of the house, which matches the one above the front balcony. |
 |
| And finally the amendments to the front door, which I felt was not visually hefty enough to counterbalance the weight of the balcony. To fix this, I added strips of egg carton to frame out the door and glued on some addition wood trims to act as carved detail to the stone. |
 |
| There is now an additional 1/2 inch on either side of the original door frame which graduates down to the exterior wall. This was an easy fix with the most challenging aspect being in trying to match the new paint to the old. The end results are as seen below. |
 |
| Well, that's all for now. I hope that you enjoyed seeing the work in progress on Villa Leone, which has been frustrating yet fun. Unfortunately my Real life garden has been sacrificed for time spent on my miniature plants. *sigh* I kinda feel bad about that but it HAS been raining so I do have an excuse. Hopefully, I'll begin work on the inside of the villa next week, although I am still in the mood to make more plants for the balcony. Janine suggested a vining geranium which sounds like a good idea to me. I do believe that a plant spilling over the balcony between the balustrades would look quite appealing. hmmm... I wonder what the weather forecast is for the second week of July? More Rain!?! sweeeeeet :D |
 |
.jpg)

