
I recently decided that I needed MORE COLOR for the front garden entry of #43 Green Dolphin Street
 |
| Here is the front entry from my last post "Miracle Grow." I feel that it is looking a bit dull for early summer |
 |
| This is how the front entry is looking now! |
Often after I've published a post about a project that I have technically labeled as "finished", I will keep re-examining the photos of that said project, especially if I feel somewhat dissatisfied with what I am viewing. I don't always know why or what is actually bugging me, but if I am constantly re-visiting a photo with a question in my mind, ("what's wrong with this picture?") then chances are, that I will sooner or later, be changing something.
Most recently, the photos of the front garden walk from my last post "Miracle Grow", were not doing it for me. I knew that for an English Garden, the front walk, was lacking some significant color.
|
 |
| the front walk "in progress" with oregano And so I began at the top of the walk and worked my way down the stairs. To draw the eye up, I added an acid green creeping plant, a golden oregano, close to the front door, used as under-planting for the purple heart and the finished tulips that are growing there. The vibrant golden oregano that now skirts the hard edge of the flower bed, visually softens it and provides that extra jolt of hot color that was needed by the front step. this is my second adjustment the photo below was the first You can see how effective the acid green is with the purple leaves; it really makes them stand out. I have bushels of this growing in my own garden so this was an obvious solution for the mini one. After looking at the photo below for a long time, I saw that the oregano would look better if it were extended the entire length of the flower bed rather than stopping half way across. Even though I had already thought that this bed was "finished" for the second time, I was still making additional changes to try and get it right. After making more oregano and re-taking the above photo, I was amazed at what a difference this made to the continuity of the border . It made sense, it looks better and there is More Color! below is the 2nd "before" and above is the 3rd "after" now it's clear as mud, right?? :)) |

   |
| Toadflax I made a weedy type of plant that "grows like stink" in my Real Life garden. I only recently found out that it has a proper name. It is called Ivy-leaf Toadflax. This mini plant should have a red-ish stem but I wasn't able to achieve that effect (yet), but the tiny violet flower that it carries you can easily see. In real life, this little creeper climbs up walls and spreads out, over, and/or through other plants, I have this doll's house version crawling all over the sweet alyssum at the base of the front step. I would normally be yanking it out by the roots to try and keep the Toadflax under control, but I am letting this miniature version alone to grow freely in my doll's house garden. :)) |
 |
the making of Irish Moss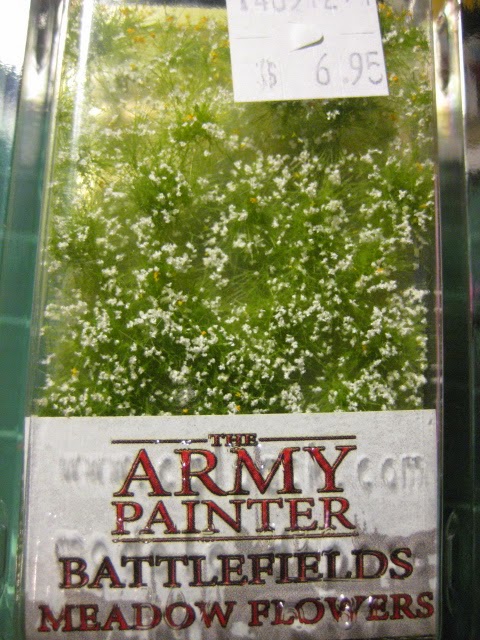 A quick trip to the hobby store is where I found some army (and /or), railroad landscaping foliage called "Meadow flowers". In the package it looked like 1:12th scale Irish moss. The very dainty flowers cost me $7.00 for a very small package but it was worth every penny because it was ideal for this miniature garden. The package contained both yellow and white meadow flowers and so I tried to stretch it to both sides of the front garden walk. |
 |
| this is what the product looks like out of the package |
 |
| I had already made and added the dense pink soapwort, (a creeping plant I made from"cut and paste"fabric plants and pink wax crayons). To increase the Color Quotient and intensify the color mix I perked up the walk with some purple campanula (grated purple kitchen sponge) for the left side of the entry and also a small bunch of switch grass for added interest. I placed the white meadow flowers "Irish Moss" on the step below, in with the sweet alyssum. |
 |
| The Soapwort, Switch grass, and Moss with the Alyssum |

 |
| This was inching closer to what I was looking for but I still wanted MORE COLOR! My earlier geraniums, went from a peach to a deep pink, then I removed the boxwood ball that use to be there and replaced it with 2 pots of rich, red geraniums placed directly underneath the pink ones . This was looking better and better and more like the English Style Garden that I had in mind. |
 |
Having beefed up the visual impact of the geraniums, I returned again to the Irish Moss. I really liked the tiny yellow flowers of the moss and I wanted some more. I just so happened to be in the Thrift Store last week where I spotted this artificial primrose plant for sale. |


 |
| the flower centers, had just the texture that I needed |
 |
| I clipped the stamens from the plastic stems initially I was going to use them as mounds. |
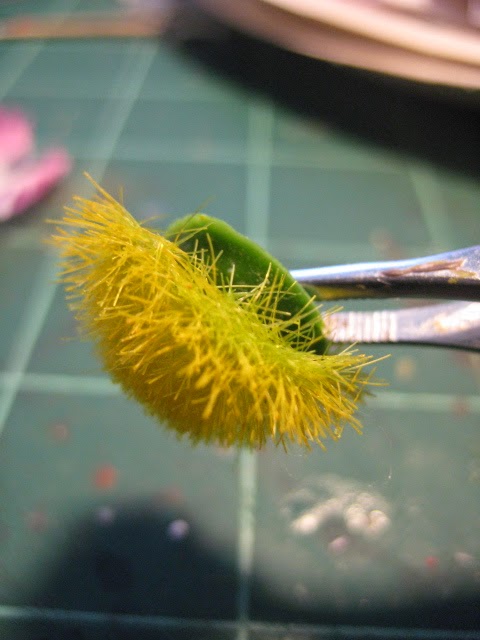 |
| But then I saw that the fibers could easily be peeled away from the plastic head. |
 |
| so here is what it looked like- Big Fuzzy Yellow Caterpillars. I needed them to look more like Moss so this is what I did... |
 |
| I used some Super hold hair spray as the adhesive and sprayed some of it onto waxed paper. |
 |
| I divided the hairy yellow stamens and dipped them into the puddle of hairspray. |
 |
| This artificial turf is fine enough for moss all on its own, but also works well when it is mixed in with other materials. For this project I sprinkled it directly onto the fuzzy wet stamens and then worked it down into the fibers with a toothpick. |
 |
| This toned down the yellow and gave it more realism. |
 |
| Ta-dah! My new Irish Moss |
 |
| I applied foam glue to the back of the clump and installed onto the steps |
| I have the tendency to "polka dot" plant in my Real Life garden, which is a bad habit that I am trying to correct. To me, gardens look better when the plants are grouped together en-masse, rather than "a little here and a little there". I made a conscious effort to group the miniature plants closer together. I had to make myself do it. My objective for the front walk was for it to look not only colorful, but lush and full, rather than disjointed and spotty. |
 |
| So I added even more homemade Irish Moss than I had originally planned. I filled in the gaps which of course, gave the front entry More Color. |
 |
| for the tiny flowers, I grated some wax crayons |
 |
| I lightly sprayed the moss with hair spray and sprinkled the shavings onto the top. Some stuck but most didn't. |
 |
 |
| I brushed off the excess |
 |
| and this is the result |
 |
| More color and much better! :D *** (interlude) |
 |
| As I was busy working on the moss, I happened to find an old laser cut kit of a pair of paper gardening gloves, with a hand trowel and a garden fork. To paint them, I left them barely connected to the paper template. I used a silver nail polish for both sides of the garden tools. For the gloves, I bent alternate fingers so that the fingers wouldn't stick together, and then I painted both sides of the gloves with white liquid paper correction fluid. I used this because it would give the flat paper some texture and dimension. I gave the gloves a couple of coats each and then used it on the handles of the garden tools as well. Liquid paper dries rather quickly, but when it is applied as thickly as I did for the gloves, it took a lot longer to completley cure. |
 |
| the original paper template |
 |
| the paper correction fluid |
 |
| the paper garden tools in progress |
 |
| the garden tools and the finished gloves Once dry, the gloves were painted with a brown acrylic paint and then when that was dry, I curved the fingers and the palm of the gloves so that the paint would crack and give the gloves a well- worn leathery look. I cut two narrow strips from the left-over template to make cuffs for the gloves. For the garden tools, I applied several layers of liquid paper to build up the handles so that they would look more dimensional and would be easier for the gardener to hold. These will be featured again in the garden, at a later date. And so another task has been completed. *** Then it was back to the garden entry for some additional fine tuning. I lightened up the stone steps with some highlights so that it would not only look more like stone but also so the plants would blend better. |
 |
| Tai the cat has settled himself in the sun, where he surveys the entire front garden walk. Both Tai and I agree, that this path is now Full of Color! |
  |
 |
| which for me is practically Purrrrr-fect! ***** To all of my New Followers, Welcome! and to those of Long-Standing, Thank You for visiting! It is always a pleasure to have all of you here, and do come again soon! :D elizabeth |
.jpg)

